Showing posts with label Skillets. Show all posts

Thursday, April 4, 2013

"Might I have bit of Earth"

One of my favorite childhood books is The Secret Garden.  As I was recently rereading it (it's still as good at 29 as it was at 10) I kept thinking about how much I wish I could have a place to grow some plants of my own.  I unfortunately do not have any outdoor space, no balcony, no outdoor window sills, nada.  I have looked into community gardens in my area, and well, the waitlists are years long.  So for the past several years I just haven't had any plants, but I am determined to change this in the new apartment.  While my outdoor space situation won't be changing, I have come to the opinion that I just don't care, I can still grow some things indoors.  In past apartments I have managed to grow some potted herbs, and I really love being able to just pick some fresh basil or rosemary as I cook.  And while my track record with basil is less than stellar, I always end up accidentally letting it flower thus killing the plant, it is actually cheaper to buy a whole new basil plant than it is to buy just a few leaves at the store. So I am currently brainstorming some ways to grow a few plants by the window, without completely blocking the light or making a jungle in that area.  Here are some images that have my mind thinking.


Vegetable Garden Tips
Image via

I love how there are several plants here, but it doesn't look wild.  I also adore the rustic style of the table.

Home: Eleven Creative Indoor Gardens
Image via

What indoor garden would be complete without succulents?  I really like the use of unique planters here and the colors of the succulents chosen.
 
Indoor garden
Image via

So this little indoor garden is using Ikea step-stools, so creative!  It's clean, simple, and has a bit of rustic vibe. Plus, these stools are real wood so they can be restained!


Image via


I really want to be able to grow my own food, sadly without an outdoor area it is very difficult to do.  This fact doesn't stop me from dreaming about it, though. Who knows, maybe if I have success with some herbs and small flowering plants I might just attempt some vegetables in doors.

I promise to share what I decide to do once I'm moved and have my "bit of Earth" started.

Do you have an indoor container garden?  What do you grow, do you have any tips to share?


Friday, February 15, 2013

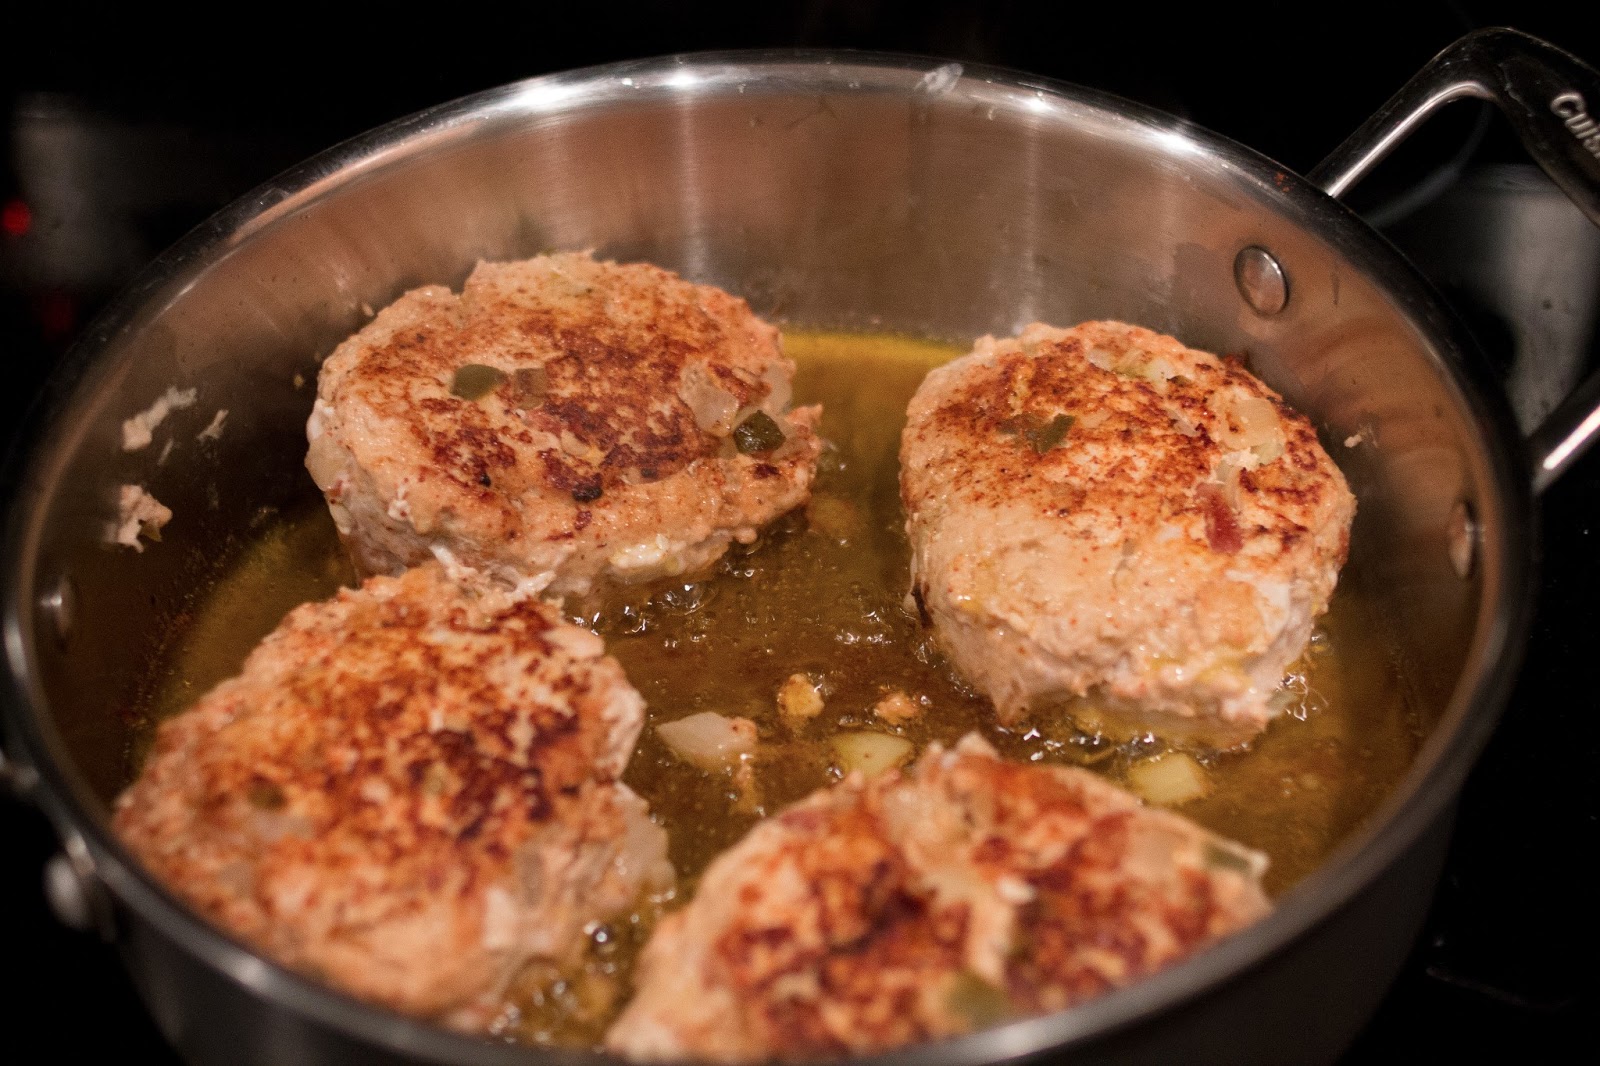
Southwest Turkey Burgers

***Don't forget to go to East Coast Creative and click on entry number 200!  You can click more than once.***


The first time I ever tried making turkey burgers was honestly less than great, the burgers came out dry and tasteless.  I wanted a burger, but I wanted it to be light and lean.  So, not knowing what I was doing I just bought some ground turkey, and made simple burger patties out of it and cooked them in a pan on the stove top, exactly the way I would have cooked a ground beef burger.  That right there was the mistake, because turkey is so lean and needs to be cooked all the way through all of the fat cooks out long before it's done drying out the final product.  It was a long time before I was willing to try again, but eventually I searched around the Internet and realized I needed to find a way to add moisture and flavor and eventually I developed this recipe.

I know some people really don't like looking at raw poultry, especially in ground form so there aren't as many pictures with this recipe.  Also, you will notice sweet potato fries on the plate in the pictures, I am still perfecting that recipe so I'm not sharing it today, but eventually I will I promise.

Ingredients:

1lb Ground Turkey Meat (I buy 99% lean)
1 Small Onion
2-3 Tbs Chunky Salsa (make sure it's a chunky kind and that it's fairly wet)
Chili Powder
2 Tbs Olive Oil

Step 1:
Dice the small onion.  Make a well in the center of the ground turkey, add the onion and salsa, mix together.  The mixture will be fairly mushy.  Form the mixture into patties, for 1lb of meat I make 4 patties.  Dust both sides of the patties with the chili powder.

Step 2:
Heat olive oil in large skillet over medium heat.  Once heated add the patties.  Cook on one side until sides begin to firm, flip.  Continue cooking for several minutes on each side and flipping.  To cook all the way through takes about 20-30 minutes.


Once done serve up and enjoy!!


Do you have a favorite turkey burger recipe?  Have you perfected sweet potato fries?


Friday, January 25, 2013

The Black Bean Diaries - Souper Soup

Both M & H are always looking for quick & easy meals that pack a nutritional punch. We've posted a couple of bean-centric dishes before here and here, but it's cold and rainy this week, so we figured a soup would be the perfect comfort food for a rainy night.  Ohh, and this is probably one of the healthiest  recipes you'll ever make -- you remember that childhood rhyme, beans beans, they're good for your heart.....we'll stop there....moving on...

M assembled this recipe after searching high and low for a black bean soup that had the different flavor layers she was looking for.  The difference in this one over those she'd previously made, is adding tomatoes, avocado & a pinch of nutmeg.  She has to give credit to
Shape Magazine, Runners World, Ina Garten, and many, many others (ahem, Pinterest).  Here's what you do...


Ingredients:

2 cans of black beans, drained
1 yellow onion, peeled & diced into small pieces
5 garlic cloves, crushed, then minced
4 carrots, peeled & chopped into small pieces
1 cup tomatoes, chopped into small pieces
2 tablespoons olive oil

Optional Toppings

avocado, (make sure it's ripe, there's nothing worse than an un-ripe avocado)
red onion
corn bread/any bread really
tortilla chips

Spices:

Paprika - 1 tablespoon
Cumin - 3 tablespoons
Cayanne Pepper - 1/4 - 1/2 teaspoon (some like it hot, some don't)
Cinnamon - 1/4 teaspoon
Nutmeg - 1/4 teaspoon
Salt & Pepper - to taste

What you'll need:

Dutch oven or large-ish pot
Cutting board & knives
Peeler
Food processor or blender

Directions:

To cut down on instructions, I listed what you need to do to the fresh ingredients above so that I don't have to list them here.
  
1. Once you've finished slicing and dicing above, slowly heat the olive oil in your dutch oven/large-ish pot until it's hot, add the onions, cook for 2 minutes.

2. Add carrots & garlic to the mixture, cook for another 2 or 3 minutes.

3. Add your spices & tomatoes, and cook for another 2 to 3 minutes until the veggies are soft.


4. Add the black beans to the mixture, then add water to the pot until it reaches about a 1/2 inch above the vegetables.


5. Bring the soup to a boil, then reduce heat and simmer for 30 minutes covered.  Make sure to check the pot every once in awhile to stir or add more water if necessary.

6. Remove the cover and cook for another 30 minutes.


7. Pour your soup into a blender and pulse until you get a consistency to your liking.


8. Serve in bowls with whatever topping you like, my favorite is with a few slices of avocado and corn bread on the side.  Enjoy!


*Sidenote - I took pictures with my iPhone and unfortunately NONE of the finished product pictures came out good enough to post (lame) so I'll make it again next week and take better pictures, I promise!


Do you have any go-to black bean recipes?


Thursday, January 17, 2013

Healthy Banana "Ice Cream"

Yes, you read that correctly, you actually can make ice cream "healthy," let us explain...so, as you've read over the past couple of weeks, both M & H are on missions to Be Better in 2013.  Like a lot of people do during the New Year, we've re-committed to our healthy routines, and are stepping it up a notch in almost every aspect of our lives.  While M's goal is to lose weight and get back to her normal size, H has had to say goodbye to most dairy and is focusing more and more on vegan recipes.  However, both of us have a soft spot for sweets...

Enter: healthy ice cream!  It's not actually ice cream at all, it's actually more of a frozen banana whip cream, but it sure tastes like ice cream!  M found this recipe on one of her favorite blogs, That's So Michelle.  All you need are bananas, almond milk, a food processor, and whatever other fruit, chocolate, or other flavors you want to add.  Yes, you read that correctly, you can count the ingredients on one hand.  Here's how you make it!  *please excuse the crappy iPhone photos, M is without a camera at the moment...


1.  Cut about 4 bananas into slices, place into big plastic freezer bag. If you're adding other fruit, slice other fruit you'll want to add, and put it in a separate freezer bag.


2.  Place in freezer for 2-3 hours.


3.  Dump bananas and other fruit into food processor, pulse until you get this consistency.


4. Little by little, add almond milk to the mixture, until you start to see this (see below, like banana whipped cream).  Quickly add chocolate chips, peanut butter, cinnamon, vanilla, shaved coconut, berries, or whatever you're adding, pulse a couple more times to completely mix.


5.  Pour entire mixture into tupperware container and put in freezer for an hour or two.


6.  Remove mixture, put in bowls, garnish with berries or a little shaved chocolate or coconut & serve!  I like mine plain or with a couple of chocolate chips.


Do you have any healthy recipes you use to satiate your sweet tooth or cravings to share?


Friday, January 11, 2013

Veggie Burritos and Guacamole

If you work in DC near the McPhearson Square area of DC, or live in the Columbia Pike area of Arlington then you are hopefully familiar with the fantastic burritos served up by Pedro & Vinny's.  In DC they operate via a food cart (not a food truck) at the corner of 15th and K, and in Arlington they now have a freestanding location a block or two down from the Arlington Cinema Drafthouse.  

When my husband worked in McPhearson Square I would sometimes come meet him for lunch and we always went to the burrito cart.  This may not sound fancy, but these burritos are amazing.  They are large and made with all fresh ingredients, and most impressive of all they are full of flavor without using any meat (the Arlington location does have meat options).  Eventually my husband changed jobs and moved locations so that our burrito lunch dates are no longer possible.  We never lost our love for these burritos though, and so we started trekking down to Columbia Pike sometimes to satisfy our cravings.  I always made sure to pay close attention every time my order was prepared, and eventually I realized that I could probably make similar burritos at home myself.  I noticed that they key elements are sauteing the black beans with spices, and steaming the tortillas.  

My hunch proved correct as I now have the process for these burritos down to a science and this recipe is so popular in my house that I make it probably every two weeks.  There are definitely additional add on items you can include that I do not use, such as cheese or sour cream, and you can omit various items, such as the refried beans, as well.

Veggie Burritos

Ingredients:
1 Box Spanish Rice (Near East brand recommended)
2 Cans Black Beans
1 Can Vacuum Packed Corn
1 Can Refried Beans (optional)
1 Head Green Leaf Lettuce
1 Pint Cherry Tomatoes
1 Medium Onion
2 Cloves of Garlic
2 Tsp Ground Cumin
2 Tsp Chili Powder
Whole Wheat Tortillas
Guacamole (recipe below)
Hot Sauce of Choice

Step 1:  This is another recipe where prep is the most important element in order to keep you from losing your mind.  Once you begin cooking everything starts moving pretty fast so if you have everything already rinsed, chopped, and diced the process will run much smoother.  So for the first step you need to rinse and chop your lettuce, rinse the cherry tomatoes, empty the black beans into a colander and rinse, and dice the onion and garlic.  Also go ahead and open the corn and empty into a microwave safe dish.  If you are also making homemade guacamole (see recipe below) to go with the burritos you should also prep all of these ingredients at this time too.


Step 2:  Once everything is rinsed, chopped and diced, you can begin to cook your Spanish rice following the directions on the back of the box.  I recommend using the Near East brand because the rice is the perfect texture once cooked, it's not too saucy or too sticky like other Spanish rice brands I've tried.  If you use this brand it will take approximately 25 minutes for the rice to cook. The entire rest of this recipe will be completed in the time it takes the rice to cook so that everything is ready at the same time.  Once you have the rice cooking you should empty the can of refried beans into a pan on the stove and start to cook over low heat.  You will want to occasionally come back and stir these beans, but generally you don't need to pay much attention to these from here on out.  Once the refried beans are on the stove you should use the next 10 minutes to make the guacamole (see recipe below).


Step 3:  When the rice has 15 minutes left to cook spray a large skillet with non-stick cooking spray and begin to heat over medium heat.  Let heat for about 2 minutes, then add diced onion and garlic along with the ground cumin and chili powder.


At this 15 minute mark you should also begin boiling the water to steam your tortillas.  I am lucky enough to have a steamer that sits on top of one of my pots.  I fill the pot about half way with water, I place the steamer on top and place the lid on the steamer.  I turn the heat to high and wait for the water to boil.  If you do not have a pot with a steamer like this I'm not sure what the best alternative would be, you need some sort of steamer that can sit over boiling water and you need a lid that can cover the top of your steamer so that the steam doesn't escape.

The steamer sits on top of the pot, it came as part of my cookware set
Step 4:  Saute the onions, garlic, and spices for about 3 minutes.  At this point your rice should have about 10 minutes left to cook.  Add the rinsed black beans to the skillet and saute over medium heat with onion, garlic, and spices.  At this time you should also place your corn in the microwave and cook for 1:30 minutes.  If you have the space on your stove you can also cook the corn in a pan on the stove top, but I typically have all of my burners in use with other items during this recipe.


Step 5:  When the rice has about 3 minutes left to cook your water for the steaming should be boiling.  Place your tortillas in the steamer and cover with the lid, 3 minutes seems to be the perfect amount of time to steam the tortillas.  I can typically fit 3-4 tortillas in my steamer at a time, it is ok if they overlap but you don't want to overfill your steamer.

I place my tortillas over the holes and cover with the lid
At the end of the 3 minutes turn off your rice and beans and remove tortillas from the steamer and place on a plate.

Steaming the tortillas makes them soft and pliable, it also helps you seal your burrito once you have it filled

Step 6:  Serve up all of your ingredients for everyone to make their own burritos.


Guacamole

I love a great, simple guacamole to add some creamy texture to my burritos.  It's such an easy thing to make and always tastes best when fresh.  If you are not familiar with buying avocados then you need to know how to pick a ripe one.  If you are going to be using it the same day then look for one with dark green skin and that feels soft when lightly squeezed, if you are going to wait a day then still look for the dark green skin but try to find one that has a little firmness when you lightly squeeze it (but it should still feel somewhat soft).

Ingredients:

1 Ripe Avocado
2 Cloves of Garlic
1 Can Petite Dices Tomatoes (or one whole tomato diced)
1 Lime Wedge
Salt & Pepper

Step 1:  Mince the garlic and place in a bowl.


Step 2:  Cut the avocado in half and scoop out the insides and add to the bowl with your garlic.


Step 3:  Drain the can of diced tomatoes, or if you are using a whole tomato dice it.  I prefer to use canned diced tomatoes simply because it is easier.  I generally like chopping and dicing vegetables, but tomatoes are my least favorite because of how soft they are.  If you are using canned tomatoes add about 3/4 of the can to your bowl with the avocado and garlic.


Step 4:  Squeeze one wedge of lime into the bowl.  The lime adds a hint of flavor and will help keep your guacamole from browning too much.  Add a pinch of salt and pepper.


Step 5:  Use a fork and mash everything in your bowl together.  You can control the texture of your guacamole, so you can leave it chunky if that's what you like, personally I prefer a creamier guacamole.  Once you have it mixed to your liking feel free to enjoy with chips, or as a topping for your burritos.


What do you like to include in your burritos?  Did any of you already know the trick of steaming the tortillas?


Wednesday, January 9, 2013

The Best Roast Chicken

Now that the holidays are over, many of us are looking forward to some mellow nights in cuddling on the couch and eating comfort (but healthy) home cooked meals.  Both H & M are trying to limit their meat intake, but sometimes we just crave a cozy chicken dish. And let's be honest, the way a roasted chicken makes our homes smell is reason enough to make it!

We cannot stress enough that this is the EASIEST recipe, but looks and smells like you're a professional chef when its done.  M has made the Perfect Roast Chicken recipe from The Barefoot Contessa Cookbook a million times, tweaking this and that to see what works best.   Below is her adaptation, but most of the credit goes to, Ina Garten. 


Shopping list:
-1 5-to-6 lb roasting chicken (hormone-free organic is best)
-kosher salt
-freshly ground black pepper
-fresh rosemary
-1 lemon, halved
-1 head garlic, cut in half cross-wise
-2 tablespoons butter, melted
-1 large red onion, peeled, thickly sliced
-paprika (a couple of shakes, probably a teaspoon or so)
-5 or 6 bay leaves
-1 cup chicken stock
-2 tablespoons all-purpose flower


You will need:
-roasting pan
-kitchen string
-carving board, or large cutting board
-sharp knives
-tin foil

Recipe
1. Pre-heat oven to 425 degrees
2. Remove giblets, discard.  Rinse chicken inside and out, remove any excess fat and leftover pinfeathers.  Pat outside dry
3. Put chicken in roasting pan, salt & pepper the cavity, then stuff with 1/2 lemon, rosemary, entire garlic head, bay leaves. Place other half of lemon on the top of all the stuffing.


4. Tie legs together with kitchen string
5. Brush entire outside of chicken with butter
6. Liberally sprinkle salt and pepper on both sides of chicken
7. Turn chicken over so that wing tips are tucked under the body of the chicken
8. Place onion slices around the chicken
    
9. Put in oven and roast uncovered for 1.5 hours (or until juices run clear when cutting between leg & thigh)
10. Once it's ready, remove from pan, place on cutting board/platter, and cover with tin foil until you're ready to carve. (The chicken smelled so good when I took it out of the oven, that I completely forgot to take a picture of the finished product, whoops!)

Quick gravy (makes about 3-4 servings, double if necessary)
1. Add 1 cup chicken stock to pan and heat on high for about 5 minutes to reduce liquid.
2. In another bowl, add 2 tablespoons of chicken drippings from roasting pan to 2 tablespoons of flower.  Mix well.
3.  SLOWLY add your chicken drippings/flour mixture to the chicken stock, reduce heat and cook, stirring for 2 minutes or so.
4.  Voila!  Quick & easy gravy.

Carve chicken, and put gravy over meat, potatoes, and any vegetable sides you want (we prefer roasted potatoes and carrots/broccoli).  


What's your favorite comfort food recipe?


Friday, January 4, 2013

Vegan Enchiladas and Black Bean Hummus

So, in sticking with the goal of listening to my body and reducing my dairy intake I did some experimenting with a favorite vegetarian enchilada recipe to find a dairy-free adaptation.  I found this, the original recipe this is based on, through Pinterest (isn't that site amazing?).  I also had this vegan stuffed shell recipe on hand, passed along by a friend.  Having made both of these original recipes numerous times, and finding some variations of my own to add, I had an idea that I could combine parts of the two to turn my veggie enchiladas into vegan enchiladas.  I took the creamy tofu mixture from the stuffed shell recipe (minus the spinach) and substituted it for the feta portion of the enchilada recipe.  I was nervous as I tried this, but lo and behold, it turned out to be a success!!!

As you read the recipe it might look like a lot of work, but really I just like to break down every little step.  Also, the key to making this recipe easy is the prep work, having everything ready to go before you start makes it pretty quick and simple.  I also acknowledge, this isn't really a "pretty" recipe in the end, but it does taste quite good.


Vegan Enchiladas

Ingredients:

Sauce -
1 Tbs Canola or Vegetable Oil
1 Small Onion
3 Cloves of Garlic
3 Tbs Chili Powder
2 Tsp Ground Cumin
2 Tsp Sugar
1 14 Oz Can Tomato Sauce
1/2 C Water
Pinch Salt & Pepper

Filling - 
1 15 Oz Can Black Beans
1 Tbs Canola or Vegetable Oil
1 Medium Onion
1 Red or Yellow Bell Pepper
1 Zucchini
1 Yellow Squash
3 Cloves of Garlic
1 1/2 C Enchilada Sauce (see above)
1 14 Oz Brick of Firm Tofu
2 Tbs Olive Oil
2 Tbs Nutritional Yeast* See bottom of post for where to find this 
2 Cloves of garlic
1/2 C Minced Cilantro (optional)
Corn Tortillas

Step 1:  As I mentioned above, the prep work for this recipe is the key to keeping this simple.  So for the first step you should dice the onions, bell pepper, zucchini, and squash.  Mince 6 of the 8 cloves of garlic (leave two whole, but peeled).  Drain and rinse the black beans.  Put half of the black beans in a bowl and mash with a fork.


Step 2:  Another prep work step, I know, but I wanted to single this out for those not familiar with  using tofu.  You need to press the liquid out of the tofu.  Here is my method: place a folded paper towel on a cutting board or plate,  place the brick of tofu on the paper towel, place another folded paper towel on top of the tofu, place something slightly heavy (but not too heavy) on to of everything.  I use a set of ceramic measuring cups as my something heavy.  Leave this set-up in place until you reach the tofu blending step below.


Step 3:  Heat 1 Tbs of your oil in a small sauce pan over medium heat.  Once heated, add 3 minced cloves of garlic and the small diced onion.


Step 4:  Saute the onions and garlic until soft and translucent.  Add the cumin, chili powder, and sugar.  Stir until fragrant (about 30 seconds), add tomato sauce and water.  Bring to a light boil, reduce heat to low and allow to simmer while you make the filling. Begin preheating the oven to 425 degrees. 


Step 5:  And now you are ready to make the tofu mixture.  Break the drained tofu into pieces and place in a food processor, add the two whole cloves of garlic, 2 Tbs olive oil, and 2 Tbs Nutritional Yeast.  


Step 6:  Blend with the food processor until the texture is creamy.  Transfer to a large mixing bowl, then just set this aside while you cook the chopped veggies.


Step 7:  Heat Tbs oil in a large pan.  Once heated add the last 3 minced garlic cloves, the medium diced onion, and the diced bell pepper.  Saute until soft.


Step 8:  Add the diced zucchini and yellow sqaush, saute until these new veggies are soft.


Step 9:  Add the whole black beans and mashed black beans.  Saute until well mixed and heated.


Step 10:  Add the cooked veggies, minced cilantro, and 1/2 C enchilada sauce to the bowl with the tofu mixture. Stir together until well blended.

I know, not really pretty, but very yummy!
Step 11:  Use a large baking  dish for cooking the enchiladas, I use my lasagna pan.  Heat the corn tortillas in the microwave for about 30 seconds, this will make them soft and pliable (although they still might crack like mine did, this doesn't affect the flavor in any way though).  Place a tortilla in your dish, place a spoonful of your filling mixture in the center of the tortilla, roll into a wrap shape and place seam down in the dish. 


I like to cram as many into my dish as possible.

Yeah they cracked on me this time, oh well.
Step 12:  I typically have filling left over and I personally like to add some of this filling to the enchilada sauce prior to pouring the sauce over the enchiladas.  This is totally optional, but something to think of trying.  So now you pour the sauce over your enchiladas and place them in the oven for 15 minutes. 


Once out of the oven serve up and enjoy!

So, maybe not the most Pinterest worthy image, but delicious all the same.
Black Bean Hummus

Sometimes I like to have a little something to snack on while I'm cooking, and this is a perfect little recipe to whip up.  Hummus is kind of amazing, you take some softened beans, add some garlic and oil and seasoning, and just blend until creamy.  I almost always have black beans on hand so this is the simplest hummus for me to make in a hurry.

Ingredients:
1 15 Oz Can Black Beans
2 Garlic Cloves Peeled
1 Tbs Olive Oil
2 Tsp Ground Cumin
1 Tbs Lemon Juice

Step1:  Place all ingredients in a food processor.


Step 2:  Blend with the processor until creamy.


Step 3:  Serve up with your favorite dipping item, I like almond nut crackers.  It's really that simple!


*Finding Nutritional Yeast:  Nutritional yeast is a magic ingredient in my opinion.  It has a cheesy sort of flavor so it is ideal for people like me who shouldn't eat cheese but still like food that has a cheese flavor.  Finding this item, however, may or may not be difficult.  I've been seeing more and more recipes calling for it, so I think it should start showing up in main stream grocery stores soon if it's not already there.  I got mine from Whole Foods.  Some Whole Foods sell nutritional yeast in the bulk section, but for those that don't go to the supplements aisle and you will find it in a canister like the one pictures below.  It is a little pricey, this can cost about $13, but the can is HUGE and a little goes a long way so it lasts a really long time.


Have any of you tried making a major modification to a favorite recipe?  How did it turn out?